Sunday, August 15, 2010

International Ghanta

Don't ask me why the name of the dish! This is what we kids used to call this at home -  'International Ghanta'. Maybe it was all the vegetables that was put in it.

Growing up, I used to hate this being made or served at home. Now I think it is a delicacy and prepare for special occasions. As I was talking earlier, my Sasu had gone to visit relatives. The day she came back, I had made this ghanta and tomato khata and dalma, another typical oriya meal. We all had a nice meal together. And yes one of the few meals that I have cooked in the last few months. I have been enjoying the summer and spending time with the kids after work, no major cooking for me! And yes summer is going to end soon and my sasu will be leaving soon too! Sigh!

This is very similar to another ghanta post, I have. Infact the ingredient list is very similar. The only difference is that this was made with Onion garlic and the taste of the dishes (with or without onion garlic) is way different from the earlier ghanta!

Also sending this ghanta  to Priya's event 'Lets sprout' . And a very Happy Independence day! Don't the colors of the veggies remind you of the Indian flag ?

Ingredients


1/2 cup of thinly chopped onions
1/2 cup of diced Potatoes
1 cup of diced Yellow Pumpkin
1/2 cup of Eggplant cut into large chunks
1/4 cup Yam (or saru)
1/3 cup Green beans (use string beans if you have them)
1/2 cup of diced Carrots
1/2 cup of diced Radish
1/2 cup of cut green papaya
few dried mango pieces (ambula)

1 handful of yellow peas soaked in water (2-3 hours)
2 hand full of chick peas (soak and keep for sprouting the day before)
1 handful of Desi Channa (soak and keep for sprouting the day before)
1 handful of green mung Dal (soak and keep for sprouting the day before)

1 tsp of punch puran seeds
1 table spoon of ginger garlic paste

2-3 tablespoon of fried Cumin powder (if freshly roasted and ground then better)
Fresh Coriander leaves
4-5 Red Chillies

4-5 bay leaves
Turmeric powder to taste
Salt to taste
Oil for cooking (you can use ghee if you want too)
Coconut pieces or shredded coconut (optional) - about handful
Ghee - 2 tea spoon (optional)


How to

Put 2-3 table spoon of oil in a frying pan and put the panch phuran seeds and let them splutter.

Add the bay leaves and the red chillies and fry for 1/2 min. Add the onion and fry until it starts changing color.

Add the vegetables that take time to cook (like papaya and radish first). Also add the sprouts and green and yellow peas. And salt and turmeric powder. Cover and cook for 5 min.

Add the ginger-garlic paste and all all other vegetables (other than eggplant and ambula).

Cover and cook in slow fire for about 45-50 min (depending on the quantity of vegetables). Keep mixing and checking every 3-4 minutes.

When all the vegetables are nearly cooked, add eggplant and cook for a few minutes. Add the ambula and ghee and fried cumin powder and cover after turning off the stove.

Garnish with cut corainder leaves and fresh grated coconut (both are optional) and serve.


Saturday, July 31, 2010

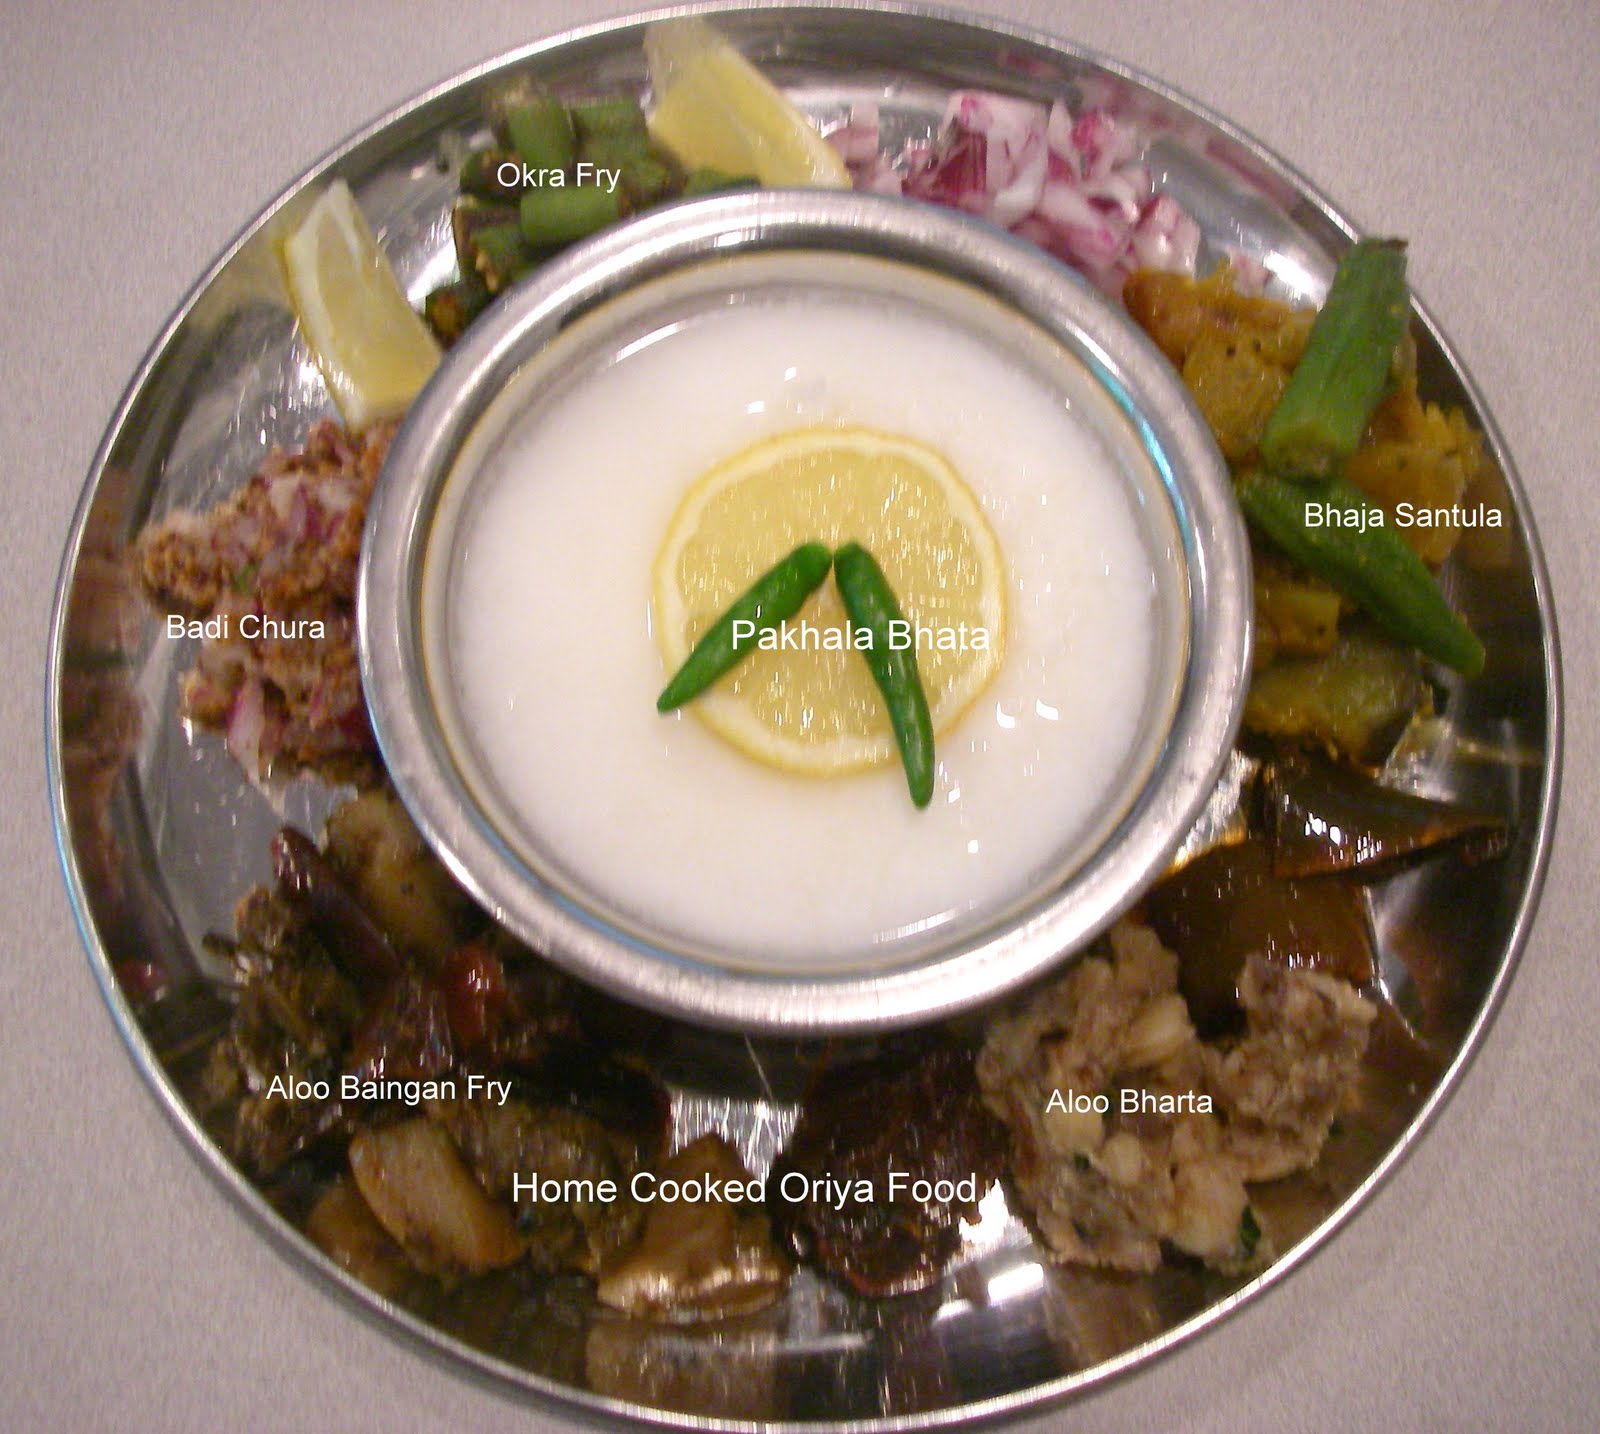
Summer feast with Pakhala Bhata

Sorry guys for disappearing for ages... As everyone would have figured out, I am not the most organized person here. So though I love challenges, and new stories/opportunities, they do throw my schedule completely haywire. Suddenly got an opportunity to go Japan for work. Didn't think before saying yes... Of course craziness started after that. All the preparation at work for the trip was keeping me tied up and then home front was busier. Leaving the 2 kids home with MIL was a challenge. I was leaving home without the kids for the 1st time in 9 yrs and it was very different routine for everyone. I think it was toughest on my older one, my little one was happy with extra TV time and pizza for any meals he chose!

After coming back, there have been other challenges. My MIL had to go meet some relatives and in the mean while, nanny decided to quit. It was craziness at it peak. Finally last Sunday, after we found a nanny and MIL came back, she prepared this pakhala feast for me. This meal was the perfect meal to ground me and bring me back home. A meal to be enjoyed over good conversation at leisure. Pakhala bhata is a day old rice soaked in water with some water, yogurt, salt and green chilies. If you don't have yogurt, substitute with  lemon or use both lemon and yogurt.  It is favored by everyone in Orissa, especially in Summer.

So here is my pakhala bhata with a whole plate full of side dishes. This is how pakhala is enjoyed with several side dishes like Badi chura, Bhaja Santula, Pickles, Aloo Bharta. Make sure crush the green chilies in the rice and water and enjoy! Only thing missing was the fish fry, which usually accompanies a bowl of pakhala. And after eating such a meal, you need a sound round of siesta! So enjoy this feast and see you back soon!

And enjoy some pictures from Tokyo.....


Monday, June 14, 2010

Happy Raja with Stuffed Idlis

Today is the start of Raja festival for Oriyas. It is a special occasion for girls. Girls get to wear new clothes and spend time with friends - dancing, singing and swinging. Lots of adhoc swings (ropes hung out from tall trees)  come up during this time. There is a lot of pithas (Oriya sweets) made during these 3 days of Raja celebration. This is my simple recipe to celebrate this great festival.

Ingredients
Urad Dal - 1 cup
Idli Rice - 1 cup
Salt to taste

For the filling
2 tablespoon of paneer (fresh, home made paneer)
2 tablespoon of gur/brown sugar (sugar will work too)
1 tablespoon of shredded coconut
1 pod of elaichi

How To
Soak the Ural dal and Idli rice overnight.  Grind it and leave it for few hours for it to ferment.

Mix the paneer, brown sugar, shredded coconut and elaichi well. You can cook on the stove top for a few minutes. I just microwaved it for 2 minutes.

Pour the batter into the mold. Add the filling on the top and steam the idlis as required for regular idlis.

Serve fresh. It tastes great with warm milk too.

Thursday, June 3, 2010

Saaga of saga or spinach

When I was a youngster, we used to live in government quarters with a huge garden. Dad was in the Orissa government service and while I guess we never had a lot of money, we did have load of fresh vegetables from the garden. And I hated all veggies other than a chosen few. When we visited friends or relatives, my mom would pack 1 or 2 huge bags (depending on the size of the visiting family) of fresh vegetables for them. While others would get sweets or fruits as gifts, ours was always these fresh vegetables and don't ask me how embarrassed I was! I couldn't imagine then why my mom would carry such gifts (Of course it was economical for my mom and tasty for the visiting family - but it was well beyond my comprehension!). When we moved out of the big house with the garden to a small house with no garden, thats when I saw the the anguish of my mom when she bought dried, not fresh vegetables at atrocious prices.

Here is a quick saga (any green leafy vegetable - my mother in law has used spinach here) with additional vegetables that is made commonly in Oriya household. The choice of vegetables is up to what is available, but these are the ones usually used. Sending this to Preeti's green gourmet event, though there is nothing gourmet about it!

Ingredients
Green leafy vegetable like spinach - a whole big bunch washed and cleaned and cut
1 small eggplant cut into small pieces
1/2 cup of pumpkin cut into small pieces
1 tablespoon of panch phutan
2 red chillies
2 tablespoon of oil/ghee
handful of badis (optional)
Salt to taste

How To
Take a pan and fry the badis in hot oil. Move the hot badis into a paper towel to drain the oil.
Take a bigger pan and add the oil. Once the oil is hot add the panch phutan and red chillies.
Add the pumpkin and salt and fry for few minutes. Then add the eggplant and cool on high heat for 2 minutes.
Then add the spinach leaves and let the spinach wilt and let the vegetables get cooked.
Once everything is cooked, adjust the salt and add the fried badis an serve.


Tips:
The Badis need to be added just before serving. It is optional and can be left out if you don't have it.
You can make this with ghee too, it tastes even better.

Thursday, May 20, 2010

Mandira Randha Ghee Anna or Ghee Rice

Here I present Ghee rice (Mandira means temple and randha is cooked) as cooked in Orissa temples. Rice served in temples is usually called Ghee Anna. When I was in Orissa this time, we had several trips to temples and ate lunches at those temples. The simplicity of this satvik food - rice, daal and mixed vegetable is awesome. We had some friends over last weekend at very short notice. Since my mother in law doesn't eat onions, garlic on Sundays, she prepared this simple prasad food. Unfortunately everything else got over, so I couldn't take pictures, so here I present the Ghee rice.

Ingredients
2 cups of cooked Rice
2-3 Bay leaves
handful of cashew nuts and raisins
1 tablespoon of ghee
1 tea spoon of Jeera or Cumin Seeds
1 tea spoon of lemon juice
Salt to taste (optional)

How To
Cook Rice with a little bit of salt (Salt is optional). Make sure the rice is not over done.
Heat a pan. Add ghee and bay leaves and the nuts and the cumin seeds.
Once the seeds splutter, add the raisins and take off the heat.
Add the lemon juice to the rice and add the seasoning from above and mix well and serve fresh.

The food from the temples comes in clay pots and hence the inspiration to serve in this coconut shaped serving dish...

Tuesday, May 4, 2010

Badi Chura

I know the Oriya food veterans will laugh at this post. Anyone and everyone can make this badi chura. It is a constant fixture in Oriya meals, especially with pakhala (rice with water combination - about which I have to post one day).
Badi is dried lentils and is usually made in fall and stored away for the year. It comes in handy as a quick side dish when you have to put a meal together in a jiffy. Here is a link to Sharmila's site on what Badi's look like and how they can be made in an oven.


Ingredients
Few Badis
1 small onion chopped
few green chillies chopped
a couple of crushed garlic
salt
1 tea spoon Oil for frying the badis

How To
Heat the oil in a pan and shallow fry the badis and keep aside.
Just before serving, mix the rest of the ingredients and serve.
The crunch of the badi with the smell of garlic and  onions is therapeutic.

Saturday, April 17, 2010

Yummy Soy Cutlets

Sorry for disappearing since such a long time. I had some major work that was supposed to finish mid March but it continued for ever...In the meanwhile my mother in law is here and as I have said earlier she is the queen of cutlets. So to introduce her arrival, here is one of the cutlets that she makes. It is healthy if you bake it or shallow fry it - the ones here has been deep fried! Enjoy!

Ingredients
2 cups of soy chunks
1/4 cup milk for soaking the soy chunks

1 tea spoon of Chili powder
4 large Potato boiled and skin peeled off and mashed
1 large Onion finely chopped
2 tea spoon of ginger-garlic paste
1 tea spoon of garam masala
1 spring of coriander leaves cut finely (optional)
Salt to taste

Bread Crumbs - as needed
1 cup of Besan
Oil for deep frying

How To
Soak the soy chunks in water and milk for few hours. After that squueze the water out and grind in a food processor to get minced soy. Now if you have minced soy, you don't have to do any grinding and the cutlets turn out much crisper!

In a nonstick pan fry Onion and ginger-garlic for 2 minutes.
Then add the minced soy and fry on slow fire for 8-10 minutes. At this point, you will see the minced soy turning slighly brown. (Dont burn it though!)
Add the garam masala and chili powder and mashed potatoes and salt to taste.
At the end add the coriander leaves and mix well and take off the stove and let it cool.

In a separate bowl, take the besan, a pinch of salt and pinch of garam masala and mix well.
Add water to make a thick batter and mix well to ensure there are no lumps.
After the soy and potatoes mixture cools, take small portions and shape into oval cutlets.
Dip them in besan batter then roll them in bread crumbs and keep aside.

I usually keep the cutlets in the refrigerator and deep fry as many as you need just before serving them. The cutlets stay fresh in the refrigerator for about 4-5 days before deep frying or baking.

If you make them, get your friends to guess the ingredients. It will be a fun game. If you love mutton cutlets, these soy cutlets remind you of them! If you are vegetarian, you will still enjoy them and get some healthy soy in too....